
When we write code to solve business problems, more often than not, we end up with large and hard to maintain codebases that keep evolving as the spiral of business requirement changes keep coming. These business requirements and changes keep coming as companies need to keep innovating in order to stay competitive in this rapidly changing world. In this article we'll be looking at how we can implement data source logic in an agnostic way in our NestJS applications.
The business logic of our codebase is the heart and soul of every software system we develop. That's what makes our system unique, because we built it to solve very specific business problems. Like Uncle Bob explained in his book Clean Architecture, we must place the business logic in the most important position of our architecture, a position in which it depends on nothing but itself, making it independent of any external changes. This can be represented clearly in the next graph:
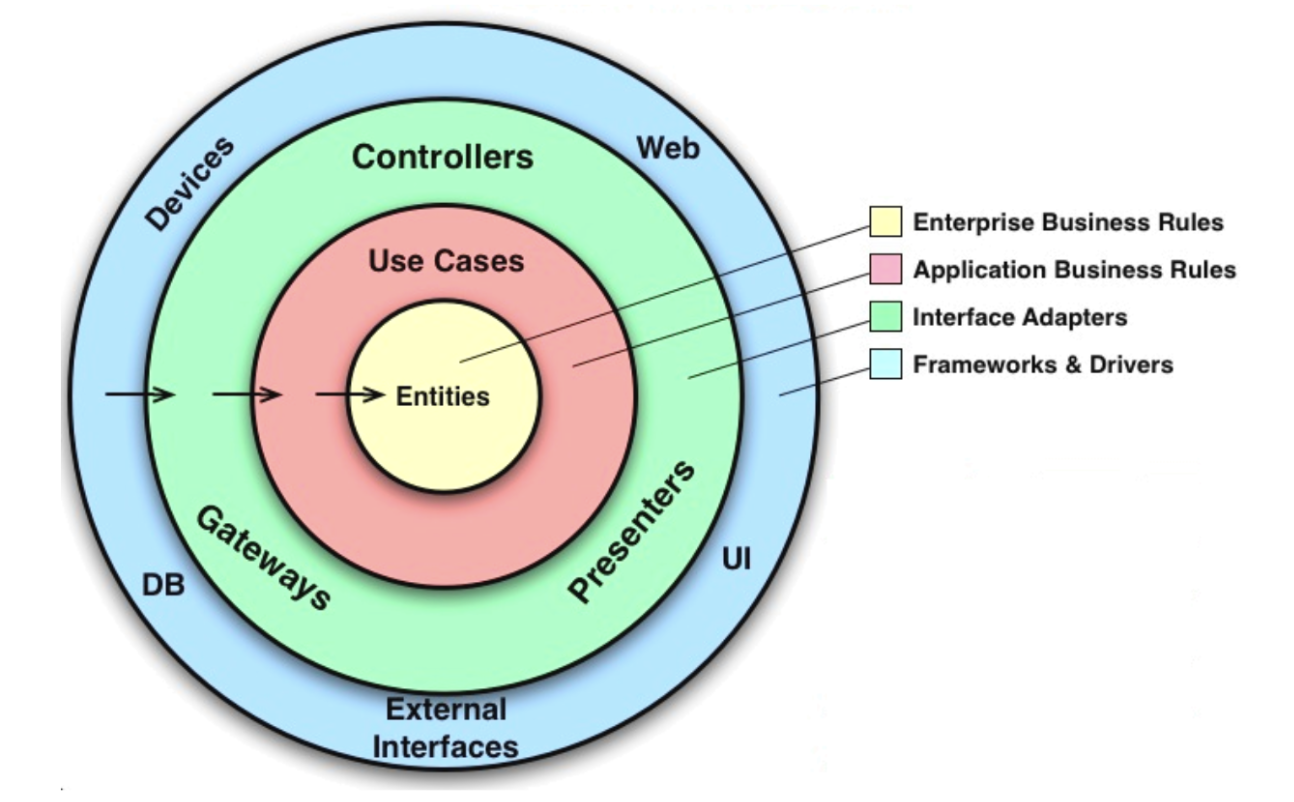
Look at how every implementation detail of an application (Web, UI, Controllers, DB) depends ultimately on the Use Cases and Entities (which is actually the business logic of our application).
That being said, we must ensure that the business logic remains volatile only to business requirement changes, not to technology or implementation changes. Because of this, one great step that we can take in this direction is to make our business logic agnostic of the data source implementation details. By doing this, we comply with the “DB” requirement that is specified in the graph above, as the vast majority of the applications nowadays don't comply with that architectural good practice.
What does it mean to be data source agnostic?
Making our application “data source agnostic” means that we can switch between data sources seamlessly without making any changes to the business logic and the rest of the application. This can be done by abstracting the business logic away from the implementation details of the data access layer by making it interact with a common interface instead. Such an interface must be able to represent data sourcing actions in a way that's relevant to the business logic, that way the encapsulated data source specific code can be changed freely, without needing to refactor the business logic nor affecting its expressiveness.
Let's see everything in action with the following example:
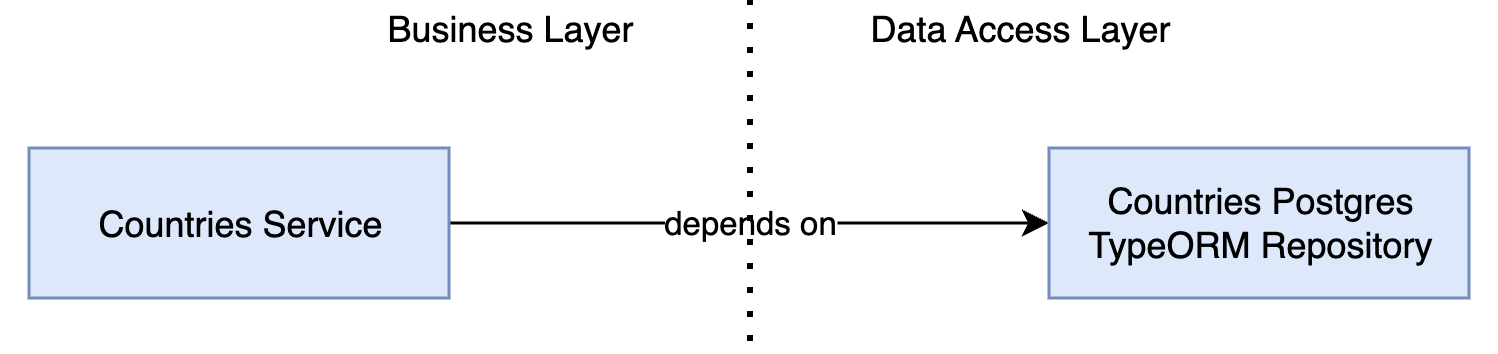
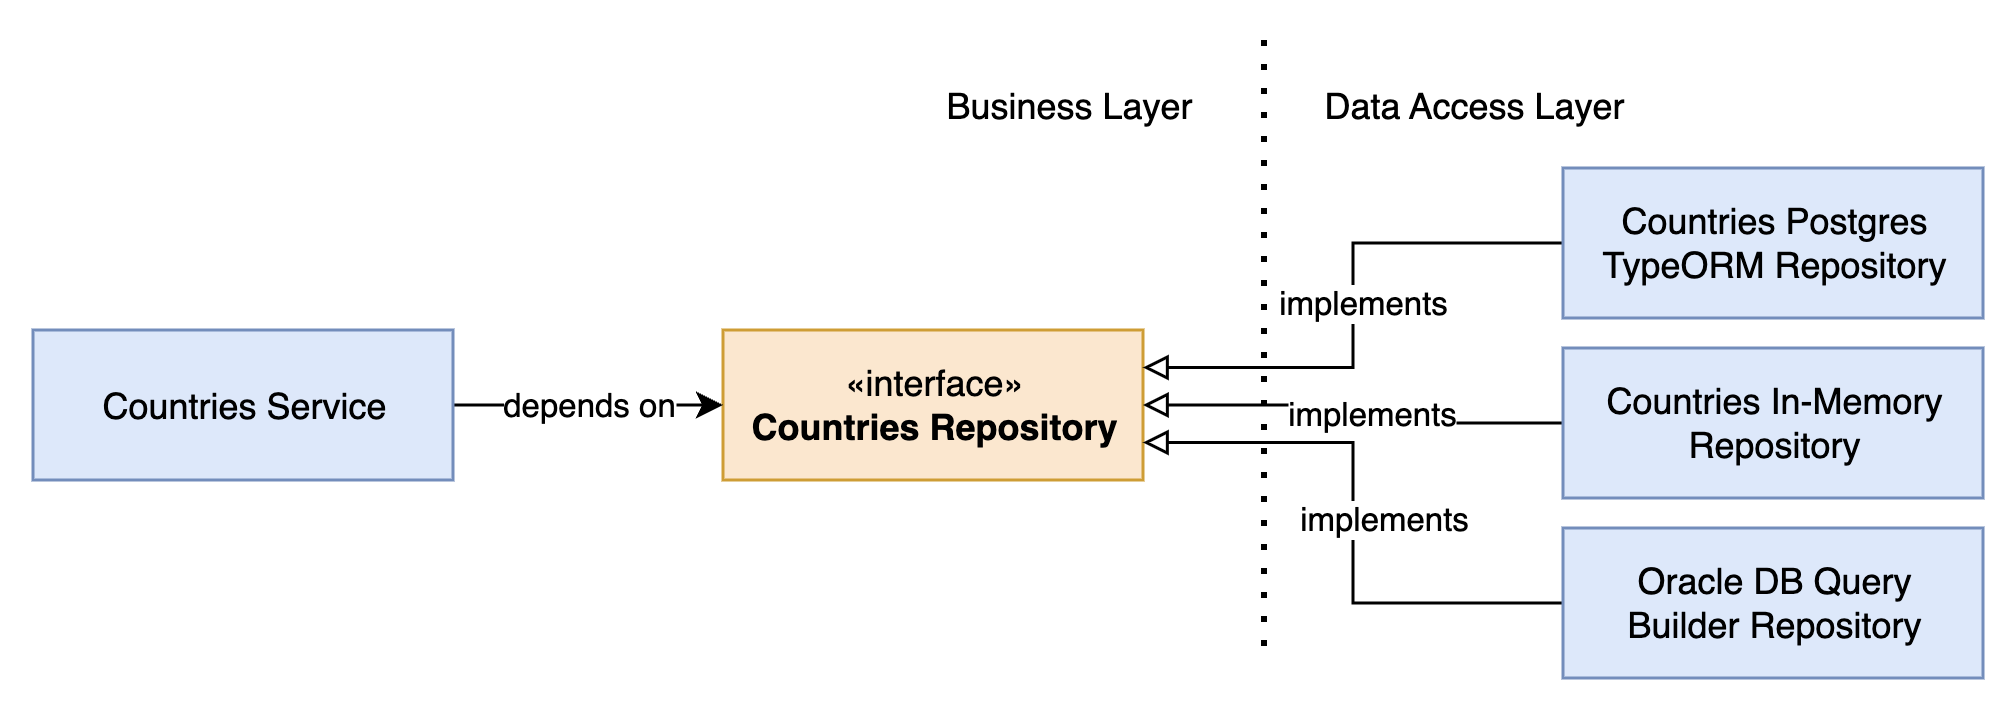
What we've done here is apply the Inversion of Control design pattern. By putting an interface in between the business logic and the data access layer, we are inverting the dependencies (and thus the control!) of the layers contained in this example. Before, the business logic layer was dependent on the data access layer and therefore susceptible to any changes to it. However, after placing the interface in the middle, we are making the data access layer depend on the interface, which is now part of the business logic layer. We are basically saying that the business logic layer depends on “this contract” (this interface) to function. Thus, the business logic will not change based on data source modifications, we just need to plug it into the existing interface, and the business logic will behave properly without need of change (so no new bugs!). All these advantages we enumerated are part of a well-known practice in object-oriented programming: encapsulation.
Implementing an Agnostic Datasource Service
Time to dive into some code!
Let's write the implementation of our solution, and for that we will need the following:
- Node.js installed (I will be using version 18 in this example).
- Nest CLI installed globally
- Postgres installed with default configuration.
Having all that installed, let's start by running this command:
$ nest new nest-agnostic$ cd nest-agnosticThis command will prompt us to select a package manager, so choose whichever you're most comfortable with.
After these commands are done executing, we will be standing on the root folder of a new NestJS project. In this example we'll be using TypeORM to communicate with Postgres, so we'll install the necessary packages, plus the NestJS config module:
$ npm i @nestjs/config @nestjs/typeorm typeorm pgGood, now we have all set and we can start writing code! Let's start by coding a module in which we will develop our example. Luckily, NestJS allows us to generate classes and modules from its CLI, even giving us the ability to generate entire modules with CRUD scaffolding. We will do just that in order to avoid writing all that by ourselves.
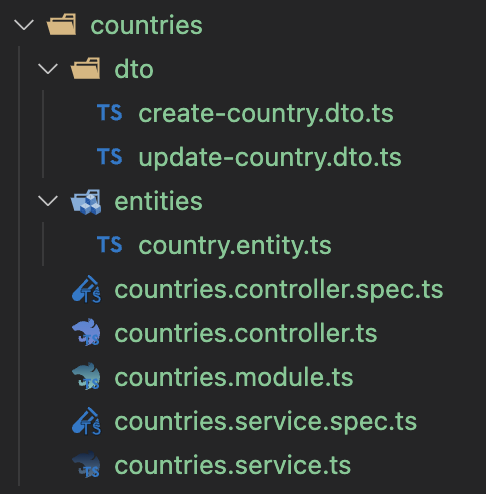
$ nest generate resource countriesHere we're telling NestJS CLI to generate a new resource called “countries”. We will be prompted to choose what kind of API we want and if we want to generate CRUD entry points (for which we will select REST, and yes).
After that, we will have our new module in the countries folder, and we will start working on it to make a basic representation of building datasource agnostic servers. You will see that both the module file, controller and service were generated automatically, together with DTOs and business entities.
We will modify the entities/country.entity.ts to have the following fields:
export class Country { constructor( public id: string, public name: string, public areaInKms: number, ) {}}Now let's start working on the data access code, which we want to be agnostic to the business logic!
Firstly, we will create a repositories folder, inside of which we'll have both the countries-.repository.interface.ts file and an implementations folder. In this case we will work on the interface file, that the business logic (the service) will depend on.
import { Inject } from '@nestjs/common';import { Country } from '../entities/country.entity';export interface CountriesRepository { create(country: Country): Promise<Country>; findAll(): Promise<Country[]>;}export const COUNTRIES_REPOSITORY_TOKEN = 'countries-repository-token';We have defined a very basic interface that consumes the Country business entity, this way the dependency goes the way of the business logic, so when the service consumes this interface, it doesn't have to learn nor depend on any new entities. We also defined a token which we will use for injecting the interface. Remember interfaces are a TS feature and do not exist at runtime, so NestJS needs a token to represent such interface - in this case a string. Lastly, we create a shortcut decorator name for Inject(COUNTRIES_REPOSITORY_TOKEN).
After this, we'll update the service code to consume this abstraction instead.
@Injectable()export class CountriesService { constructor( @Inject(COUNTRIES_REPOSITORY_TOKEN) private countriesRepository: CountriesRepository, ) {} create(countryDto: CreateCountryDto) { return this.countriesRepository.create(countryDto); } findAll() { return this.countriesRepository.findAll(); } // …}Look at how the service knows nothing about the underlying datasource! We could be using Redis, PostgreSQL, MariaDB, MongoDB, you name it, and it will never know! The business logic here is as independent as it can be, and no changes to the data access layer will add bugs to the business logic itself, it will remain immaculate - which is what we care for.
Okay so, we have the idea ready at compile time, but we need to make it work at runtime. Thus, we'll start coding the TypeORM implementation.
To keep this as simple as possible we will not write any tests, but here at Trilon (the services branch of NestJS), we strongly recommend following TDD when writing production code, for which you can read the series of Articles about Test Driven Development (TDD) in NestJS written by Trilon's own Thiago Martins.
First, we'll import TypeOrmModule, provided by @nestjs/typeorm, and add it to the imports list in app.module.ts. We'll use some default configuration just for the sake of simplicity.
@Module({ imports: [ CountriesModule, TypeOrmModule.forRoot({ type: 'postgres', host: 'localhost', port: 5432, username: 'postgres', password: 'postgres', database: 'postgres', entities: [Country], synchronize: true, }), ], controllers: [AppController], providers: [AppService],})export class AppModule {}Secondly, let's define a TypeORM model for the Country entity, and we'll create the file inside a models folder within countries:
import { Column, Entity, PrimaryColumn } from 'typeorm';@Entity()export class Country { @PrimaryColumn() public id: string; @Column() public name: string; @Column() public areaInKms: number;}And now let's write the TypeORM repository in a file inside the repositories/implementations folder.
import { Country } from '../../models/country.model';import { CountriesRepository } from '../countries.repository.interface';import { Repository } from 'typeorm';export class CountriesTypeOrmRepository implements CountriesRepository { constructor(private countriesRepository: Repository<Country>) {} async create(country: Country) { await this.countriesRepository.insert(country); return country; } async findAll() { return this.countriesRepository.find(); }}Note how we haven't added the @Injectable() decorator. This is because we will not use Nest's injection for this provider, you will see why now.
What we are trying to achieve here is being able to seamlessly swap between data sources. We want to be able to change repositories of any domain entity without having to change any code whatsoever, only by environment variables. To achieve this we have to create a factory provider that will tell Nest which of the repository implementations to inject, so the file to create will be inside the repositories folder with the name countries.repository.provider.ts. We'll see the solution to it next and we'll break it down afterwards.
// other imports above ...import { InjectRepository } from '@nestjs/typeorm';import { DataSource } from '../../data/constants';import { Repository } from 'typeorm';import { Country } from '../models/country.model';export function provideCountriesRepository(): Provider[] { return [ { provide: COUNTRIES_REPOSITORY_TOKEN, useFactory: async ( dependenciesProvider: CountriesRepoDependenciesProvider, ) => provideCountriesRepositoryFactory(dependenciesProvider), inject: [CountriesRepoDependenciesProvider], }, CountriesRepoDependenciesProvider, ];}async function provideCountriesRepositoryFactory( dependenciesProvider: CountriesRepoDependenciesProvider,) { await ConfigModule.envVariablesLoaded; switch (process.env.COUNTRIES_DATASOURCE) { case DataSource.TYPEORM: return new CountriesTypeOrmRepository( dependenciesProvider.typeOrmRepository, ); case DataSource.MEMORY: default: return new CountriesInMemoryRepository(); }}@Injectable()export class CountriesRepoDependenciesProvider { constructor( @InjectRepository(Country) public typeOrmRepository: Repository<Country>, ) {}}🔎 Okay, let's go over the code and explain it step by step.
Putting it all together
First, we wrote the function provideCountriesRepository that will be responsible for returning the dynamic provider that will inject the repository implementation. We are making use of useFactory in order to define an asynchronous factory provider. This factory calls the provideCountriesRepositoryFactory function.
The purpose of this function is to await (hence we need an async factory) the .env to file load so we can read the environment variables and know which of the repositories to instantiate. It then instantiates such repository by passing the constructor parameters (dependencies) needed. These dependencies we get from the CountriesRepoDependenciesProvider class.
This class is defined as Injectable and the purpose of it is to use NestJS's IoC container to inject the dependencies that each of our repositories implementations need so they can be instantiated in the previous method with their corresponding dependencies.
We do the implementation this way because we need to wait for the environment variables to load, so we know what repository to manually instantiate and pass as a singleton to whichever class depends on the repository interface (token).
🚀 And that's it!
You can now use whichever repository you want interchangeably, and you can just plug in any new ones as long as they respect the interface.
💻 The complete source code can be found here.
Learn NestJS - Official NestJS Courses 📚
Level-up your NestJS and Node.js ecosystem skills in these incremental workshop-style courses, from the NestJS Creator himself, and help support the NestJS framework! 🐈🚀 The NestJS Fundamentals Course is now LIVE and 25% off for a limited time!
🎉 NEW - NestJS Course Extensions now live!
- NestJS Advanced Concepts Course now LIVE!
- NestJS Advanced Bundle (Advanced Architecture and Advanced Concepts) now 22% OFF!
- NestJS Microservices now LIVE!
- NestJS Authentication / Authorization Course now LIVE!
- NestJS GraphQL Course (code-first & schema-first approaches) are now LIVE!
- NestJS Authentication / Authorization Course now LIVE!