
The @nestjs/microservices package enables developers to easily set up microservice servers and clients - but what if you wanted an app written in another language or framework to use those microservices ?
In this tutorial, we'll be looking at how to communicate between Laravel PHP framework and a NestJS microservice specifically, but even if you do not use Laravel (or PHP), the same ideas & logic apply for connecting NestJS with a different framework or language of your choice (ie: ASP.NET, Java, etc).
To understand how these relationships work, we will be building a basic Laravel client that makes calls to NestJS microservices.
Hint: As we'll see, once we know the payload schema and channel names, it's actually quite simple!
Objectives
In order to demonstrate how to use NestJS Microservices from Laravel, we need to accomplish the following tasks:
- Install Redis
- Setup a basic NestJS microservice
- Review how NestJS microservices communicate
- Build a client for Laravel that calls the microservice
Let's get started!
Install Redis
For this example, let's use Redis as the microservice transport, as it is a good choice given most Laravel users are familiar with Redis -- and are most likely already using it. Additionally, it provides an easy way to monitor communications; just run redis-cli monitor from your terminal.
To install redis, issue the following commands in your terminal:
MacOS: brew install redis
Ubuntu: sudo apt -y install redis-server
If Redis installed properly, a server should be running on port 6379. To verify this, run redis-cli from your terminal. If you get a prompt that displays the host and port number as shown below, Redis was successfully installed. Type quit to exit the CLI.
$ redis-cli127.0.0.1:6379> quitSetup the NestJS Microservice
Next, we should create a new NestJS project. Open up a terminal and issue the following commands to create a new project and install the necessary dependencies:
$ nest new PROJECT_NAME$ cd PROJECT_NAME$ yarn add @nestjs/microservices redisOnce complete, open your favorite code editor and replace the contents of main.ts:
import { NestFactory } from '@nestjs/core';import { AppModule } from './app.module';import { Transport } from '@nestjs/microservices';async function bootstrap() { const app = await NestFactory.createMicroservice(AppModule, { transport: Transport.REDIS, options: { url: 'redis://localhost:6379', }, }); await app.listenAsync();}bootstrap();as well as the app.controller.ts:
import { Controller } from '@nestjs/common';import { MessagePattern } from '@nestjs/microservices';import { from, Observable } from 'rxjs';@Controller()export class AppController { @MessagePattern({ cmd: 'greeting' }) getHello(name: string): string { return `Hello ${name}!`; } @MessagePattern({ cmd: 'observable' }) getObservable(): Observable<number> { return from([1, 2, 3]); }}In the controller, you can see we have two commands available. The first is a greeting command that will return "Hello \<name\>!". The second command, observable, returns a simple observable that emits the numbers 1, 2, 3 in sequence and then completes. This will be used to demonstrate the difference in how observables are handled.
How NestJS Microservices Communicate
Before we jump into building a client in Laravel, let's take a moment to review how our NestJS microservice communicates.
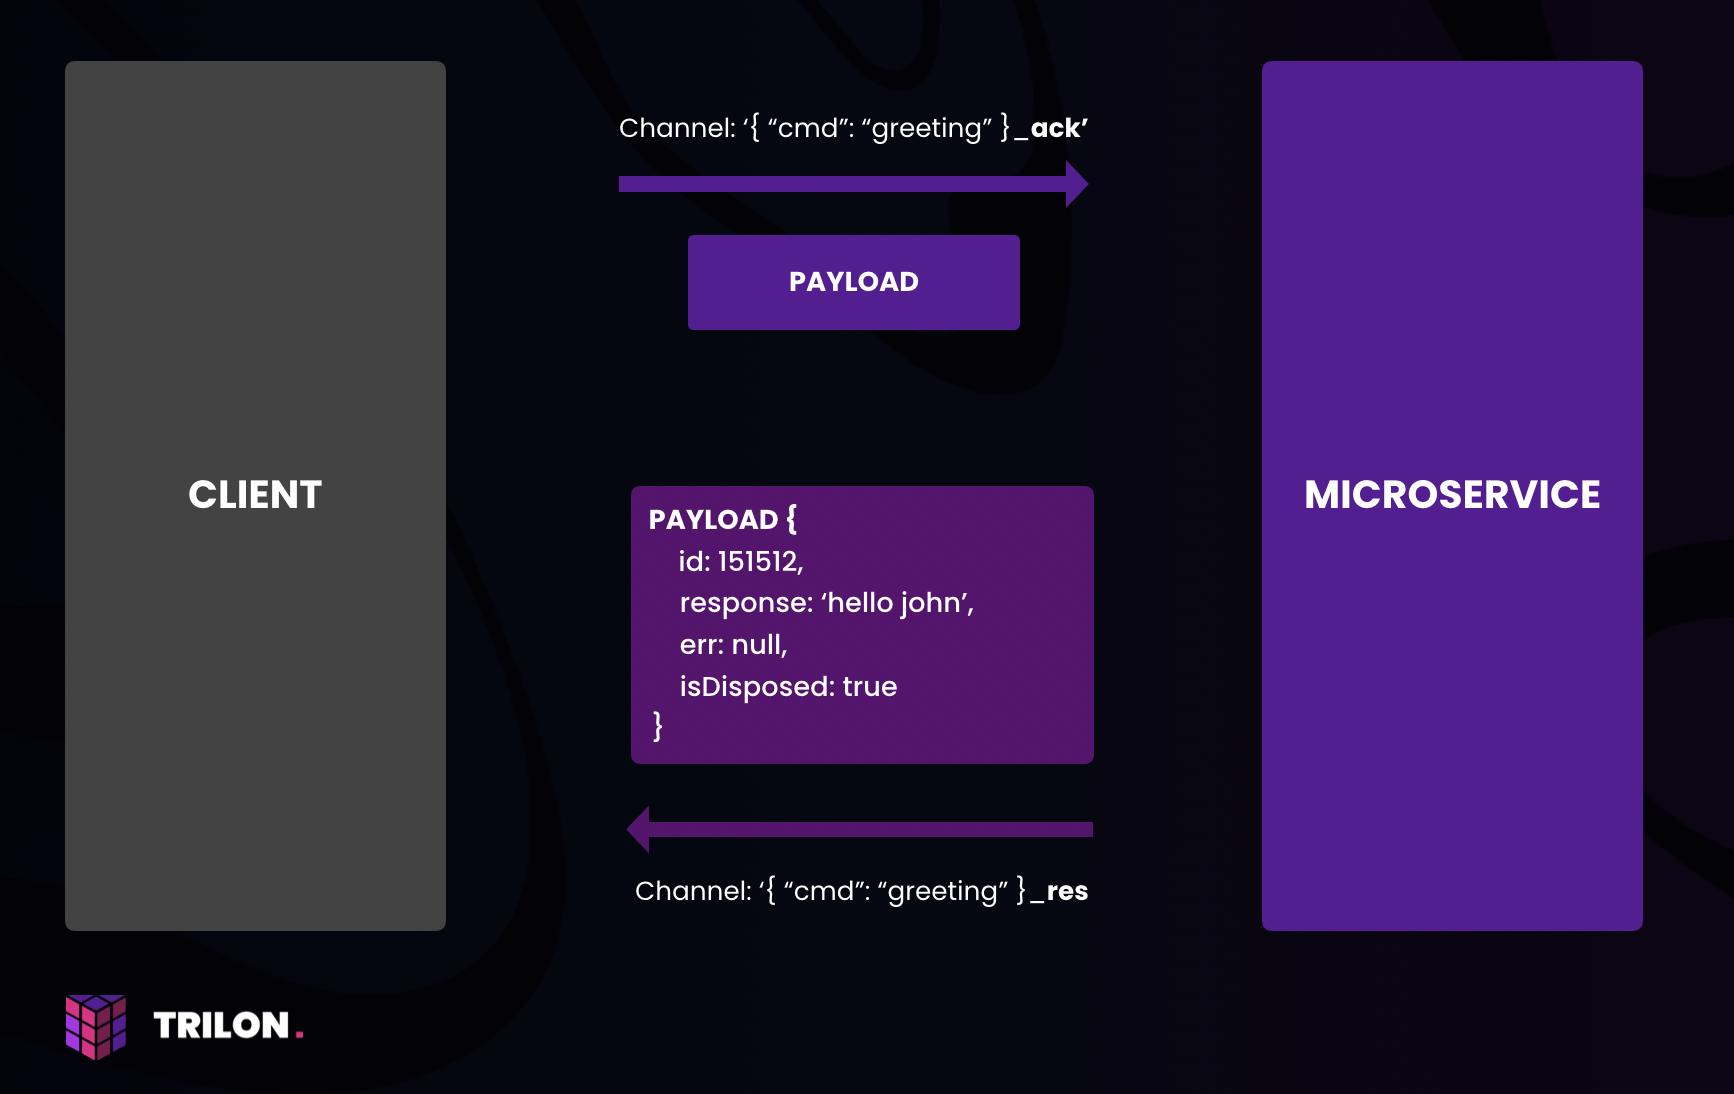
For each command, Nest will setup two one-way channels in Redis: one to listen for requests and the other to send the response(s). Under the hood, our microservice communicates by accepting serialized objects (i.e: the request payload) over one channel and then returning a response payload (again, as a serialized object) via the other channel.
Thus, in order to build a client, we must know the naming convention for these channels and how the payloads are structured. Once that is understood, the rest is simple.
Channel Naming Convention
Determining the proper channel name is as easy as appending _ack or _res to the JSON stringified pattern.
NOTE: The naming convention will change in the next major release due to this PR.
For each method decorated with @MessagePattern(<pattern>), NestJS subscribes to a Redis pub/sub channel named \<pattern\>_ack and will publish responses to the channel \<pattern\>_res. For example, for our greeting command, NestJS will subscribe to '{ "cmd": "greeting" }_ack' and publish responses on channel '{ "cmd": "greeting" }_res'.
Payload Schema
In order to make a request to the microservice, you need to send an object with the following keys over the proper channel name:
- id: a UUID used to track the response for a particular request
- pattern: the message pattern defined in the NestJS microservice
- data: the param(s) passed from the client
For instance, to execute the greeting command in our example microservice, you could send an object that looks like this over channel '{ "cmd": "obervable" }_ack':
{ "id": "68950cb0-397b-43b3-bf03-9c5f8aa619fa", "pattern": "{ \"cmd\": \"obervable\" }", "data": "John"}The response you receive in return will have the following schema:
- id: will match the UUID of the request object
- response: the returned value
- err: error message;
nullif no error - isDisposed: when present and true, identifies object as the last transmission in the response; it is only present on the last response object
If the object above were sent, the response would look like this:
{ "id": "68950cb0-397b-43b3-bf03-9c5f8aa619fa", "response": "Hello John!", "err": null, "isDisposed": true}NOTE: The shape of messages will slightly change in the next major release due to this PR. Nest will no longer send
errproperty if its value isnull.
Single message
Since the greeting command does not return an observable, only one response object is returned.
Streaming messages
However, if we were to make a call to the observable command, we would receive multiple response objects. The final response object sent would be marked with the isDisposed key to identify itself as the last.
Laravel Setup
We have four steps to complete in order to get Laravel up and running with NestJS:
- Create a new Laravel project
- Configure the Redis client
- Create a NestJS service & bind it to the container
- Verify the service is working properly
Create a new Laravel project
Enter the following commands in your terminal to create the new Laravel project and install the dependencies:
$ laravel new PROJECT_NAME$ cd PROJECT_NAME$ composer require predis/predisUpdate the Redis Configuration
To make the necessary updates to the Redis config, open config/database.php and make the following changes:
NOTE: The
phpredisdriver should work, too, but I chosepredissince it doesn't require a PECL extension to be installed.
...'redis' => [ // 'client' => env('REDIS_CLIENT', 'phpredis'), // <-- Change this 'client' => env('REDIS_CLIENT', 'predis'), // <-- To this 'options' => [ 'cluster' => env('REDIS_CLUSTER', 'redis'), // 'prefix' => env('REDIS_PREFIX', Str::slug(env('APP_NAME', 'laravel'), '_').'_database_'), // <-- Change this 'prefix' => '' // <-- To this ], 'default' => [ 'url' => env('REDIS_URL'), 'host' => env('REDIS_HOST', '127.0.0.1'), 'password' => env('REDIS_PASSWORD', null), 'port' => env('REDIS_PORT', 6379), 'database' => env('REDIS_DB', 0), ], // Make a copy of the "default" array directly above // & rename it "pubsub" as shown directly below. 'pubsub' => [ 'url' => env('REDIS_URL'), 'host' => env('REDIS_HOST', '127.0.0.1'), 'password' => env('REDIS_PASSWORD', null), 'port' => env('REDIS_PORT', 6379), 'database' => env('REDIS_DB', 0), ], 'cache' => [ 'url' => env('REDIS_URL'), 'host' => env('REDIS_HOST', '127.0.0.1'), 'password' => env('REDIS_PASSWORD', null), 'port' => env('REDIS_PORT', 6379), 'database' => env('REDIS_CACHE_DB', 1), ],],...Here's a summary of the changes made to the Redis configuration:
- The first change instructs Laravel to use predis package for communicating with Redis.
- The second change is to avoid a "gotcha". We need to remove Laravel's auto-prefixing of Redis names or the channel names will not match what NestJS expects. In order to prevent our channel names from being prefixed with "laraveldatabase", set the prefix to an empty string.
- The final change is an additional Redis connection that is identical to the first. We need to listen on one channel for a response while publishing on another; therefore, two connections are required.
Create a client for NestJS microservice
Since this is only a demonstration, I will avoid making a package and just create a single class that I place in the app/Services directory. If you do not have this directory, you should create it. Add a new file called NestJsService.php to this directory and fill it with the contents below.
<?phpnamespace App\Services;use Illuminate\Redis\RedisManager;use Illuminate\Support\Str;use Predis\PubSub\Consumer;use Illuminate\Support\Collection;class NestJsService{ /** @var RedisManager $redis */ protected $redis; function __construct(RedisManager $redis) { $this->redis = $redis; } /*---------------------------------------------------------------------* PUBLIC METHODS *---------------------------------------------------------------------*/ public function send($pattern, $data = null) { // Build the payload object from the params $payload = $this->newPayload($pattern, $data); // Make a call to NestJS with the payload & // return the response. return $this->callNestMicroservice($payload); } /*---------------------------------------------------------------------* INTERNAL METHODS *---------------------------------------------------------------------*/ /** * Create new UUID * * @return string */ protected function newUuid() { return Str::uuid()->toString(); } /** * Create new collection * * @return Collection */ protected function newCollection() { return collect(); } /** * Create new payload array * * @param string $pattern * @param mixed $data * @return array */ protected function newPayload($pattern, $data) { return [ 'id' => $this->newUuid(), 'pattern' => json_encode($pattern), 'data' => $data, ]; } /** * Make request to microservice * * @param array $payload * @return Collection */ protected function callNestMicroservice($payload) { $uuid = $payload['id']; $pattern = $payload['pattern']; // Subscribe to the response channel /** @var Consumer $loop */ $loop = $this->redis->connection('pubsub') ->pubSubLoop(['subscribe' => "{$pattern}_res"]); // Send payload across the request channel $this->redis->connection('default') ->publish("{$pattern}_ack", json_encode($payload)); // Create a collection to store response(s); there could be multiple! // (e.g., if NestJS returns an observable) $result = $this->newCollection(); // Loop through the response object(s), pushing the returned vals into // the collection. If isDisposed is true, break out of the loop. foreach ($loop as $msg) { if ($msg->kind === 'message') { $res = json_decode($msg->payload); if ($res->id === $uuid) { $result->push($res->response); if (property_exists($res, 'isDisposed') && $res->isDisposed) { $loop->stop(); } } } } return $result; // return the collection }}That wasn't so bad, right? Hopefully my code is clear enough to follow with the comments. However, even if you don't fully understand it, you can focus on the single public method, send(), which is used to make requests to the microservice. To make a request, you pass in the pattern and data as shown below.
$nestService = new NestJsService();$result = $nestService->send(['cmd' => 'greeting'], 'Karla');At this point, we're ready to test our setup to see if it works. But before moving forward, let's bind this service to the container so we can inject it wherever needed. To do this, replace the contents of the app/Providers/AppServiceProvider.php file with what you see below.
<?phpnamespace App\Providers;use Illuminate\Support\ServiceProvider;class AppServiceProvider extends ServiceProvider{ /** * Register any application services. * * @return void */ public function register() { // Bind the NestJsService to the container $this->app->singleton(\App\Services\NestJsService::class); }}Create an Endpoint for Testing
Since this is just a testing endpoint, let's avoid creating a controller and insert the code directly into the route file. Open up your routes/api.php and replace the contents with what you see below.
<?phpuse Illuminate\Http\Request;use App\Services\NestJsService;Route::post('/greeting', function (Request $request, NestJsService $nestService) { $name = $request->get('name'); $nestResponse = $nestService->send(['cmd' => 'greeting'], $name); return $nestResponse->first();});Route::get('/observable', function (NestJsService $nestService) { $nestResponse = $nestService->send(['cmd' => 'observable']); return $nestResponse->sum();});And, with that completed, I think we're ready to give it a spin!
Does it work ?
Let's start the NestJS and Laravel apps and hit these endpoints to see if everything is working properly. Navigate to your NestJS project directory and start the server:
$ cd full_path_to_nestjs_project$ yarn start:devThen head over to the Laravel project directory and start the server up there, too.
$ cd full_path_to_laravel_project$ php artisan serveNext, use the tool of your choice to send a POST request to the greeting endpoint. You can use a GUI like Postman or Insomnia or a simple CLI tool like curl or httpie. I'm fond of httpie so that's what I will use.
$ http --form POST http://127.0.0.1:8000/api/greeting name="John"

HTTP/1.1 200 OK
Cache-Control: no-cache, private
Connection: close
Content-Type: text/html; charset=UTF-8
Date: Sun, 15 Sep 2019 23:21:55 +0000
Date: Sun, 15 Sep 2019 23:21:55 GMT
Host: 127.0.0.1:8000
X-Powered-By: PHP/7.3.1
X-RateLimit-Limit: 60
X-RateLimit-Remaining: 59

Hello John!
Excellent! Now let's try the endpoint that calls the observable command.
$ http http://127.0.0.1:8000/api/observable

HTTP/1.1 200 OK
Cache-Control: no-cache, private
Connection: close
Content-Type: text/html; charset=UTF-8
Date: Sun, 15 Sep 2019 23:22:18 +0000
Date: Sun, 15 Sep 2019 23:22:18 GMT
Host: 127.0.0.1:8000
X-Powered-By: PHP/7.3.1
X-RateLimit-Limit: 60
X-RateLimit-Remaining: 57
HINT: If you'd like to see the communications between Laravel & NestJS, open up a separate terminal, run
redis-cli monitor, and hit those endpoints again. All traffic will be logged to your terminal.
In Conlusion
- NestJS Microservices can be called from any framework
- As NestJS is setup to listen/receive data from Redis, we need to ensure that we're aware of the naming schema from Laravel.
Closing Remarks
While I enjoy building projects from scratch, more often than not, I find myself using NestJS to augment existing projects with new services. I hope that you found this tutorial helpful and extracted some practical knowledge. I also hope that you use this new knowledge to build services powered by NestJS for your existing apps--regardless of the language or framework they are built with!
Learn NestJS - Official NestJS Courses 📚
Level-up your NestJS and Node.js ecosystem skills in these incremental workshop-style courses, from the NestJS Creator himself, and help support the NestJS framework! 🐈🚀 The NestJS Fundamentals Course is now LIVE and 25% off for a limited time!
🎉 NEW - NestJS Course Extensions now live!
- NestJS Advanced Concepts Course now LIVE!
- NestJS Advanced Bundle (Advanced Architecture and Advanced Concepts) now 22% OFF!
- NestJS Microservices now LIVE!
- NestJS Authentication / Authorization Course now LIVE!
- NestJS GraphQL Course (code-first & schema-first approaches) are now LIVE!
- NestJS Authentication / Authorization Course now LIVE!