
I have been working with NestJS for a while now, and during this time I've come across many misconceptions and confusions that developers have about it, but sometimes these misconceptions might stem from a lack of understanding of what the NestJS runtime (or what a NestJS app) is exactly.
Even though we have made vast improvements to the documentation over the years, we haven't dived into an explanation on this specific topic, and how everything comes together within a NestJS application.
In case you're not familiar with NestJS, it is a TypeScript Node.js framework that helps you build enterprise-grade efficient and scalable Node.js applications.
So let's get to it.
I think the best place to start getting a better understanding of the NestJS runtime, is to take a closer look at the bootstrap process, which will be the central axis of this article.
Every Nest app has a main.ts file which is the entrypoint for the app's process. Here we define and call the application's bootstrap() method which creates the Nest application and initializes it.
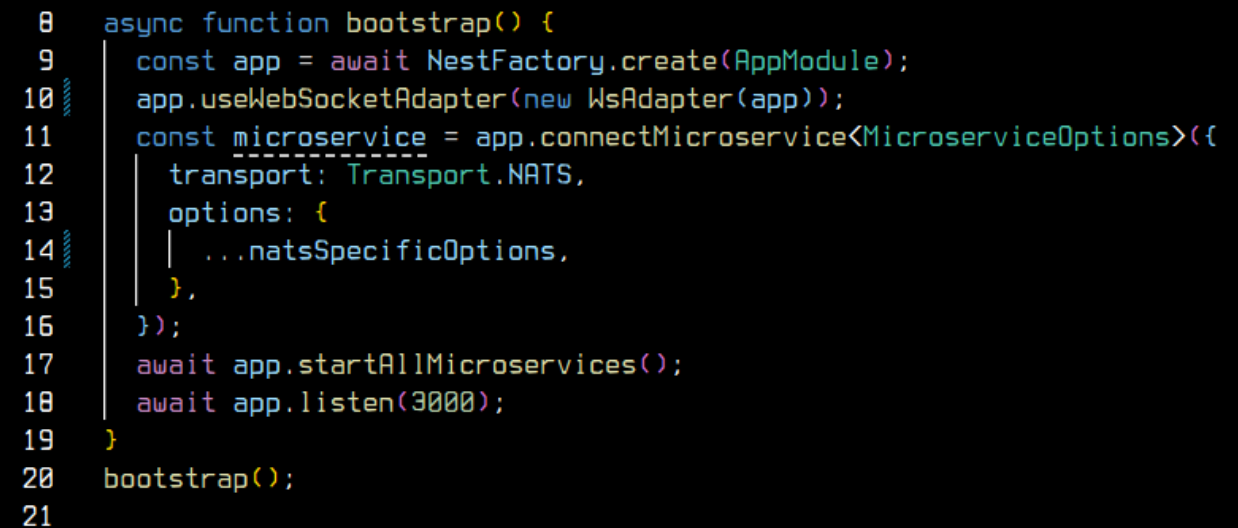
This is a standard example that implements a websocket adapter, an Http server and a NATs client.
To help us understand this process visually, below we have a neat little diagram of the generalized product of the bootstrap process to guide us alongside the rest of the article
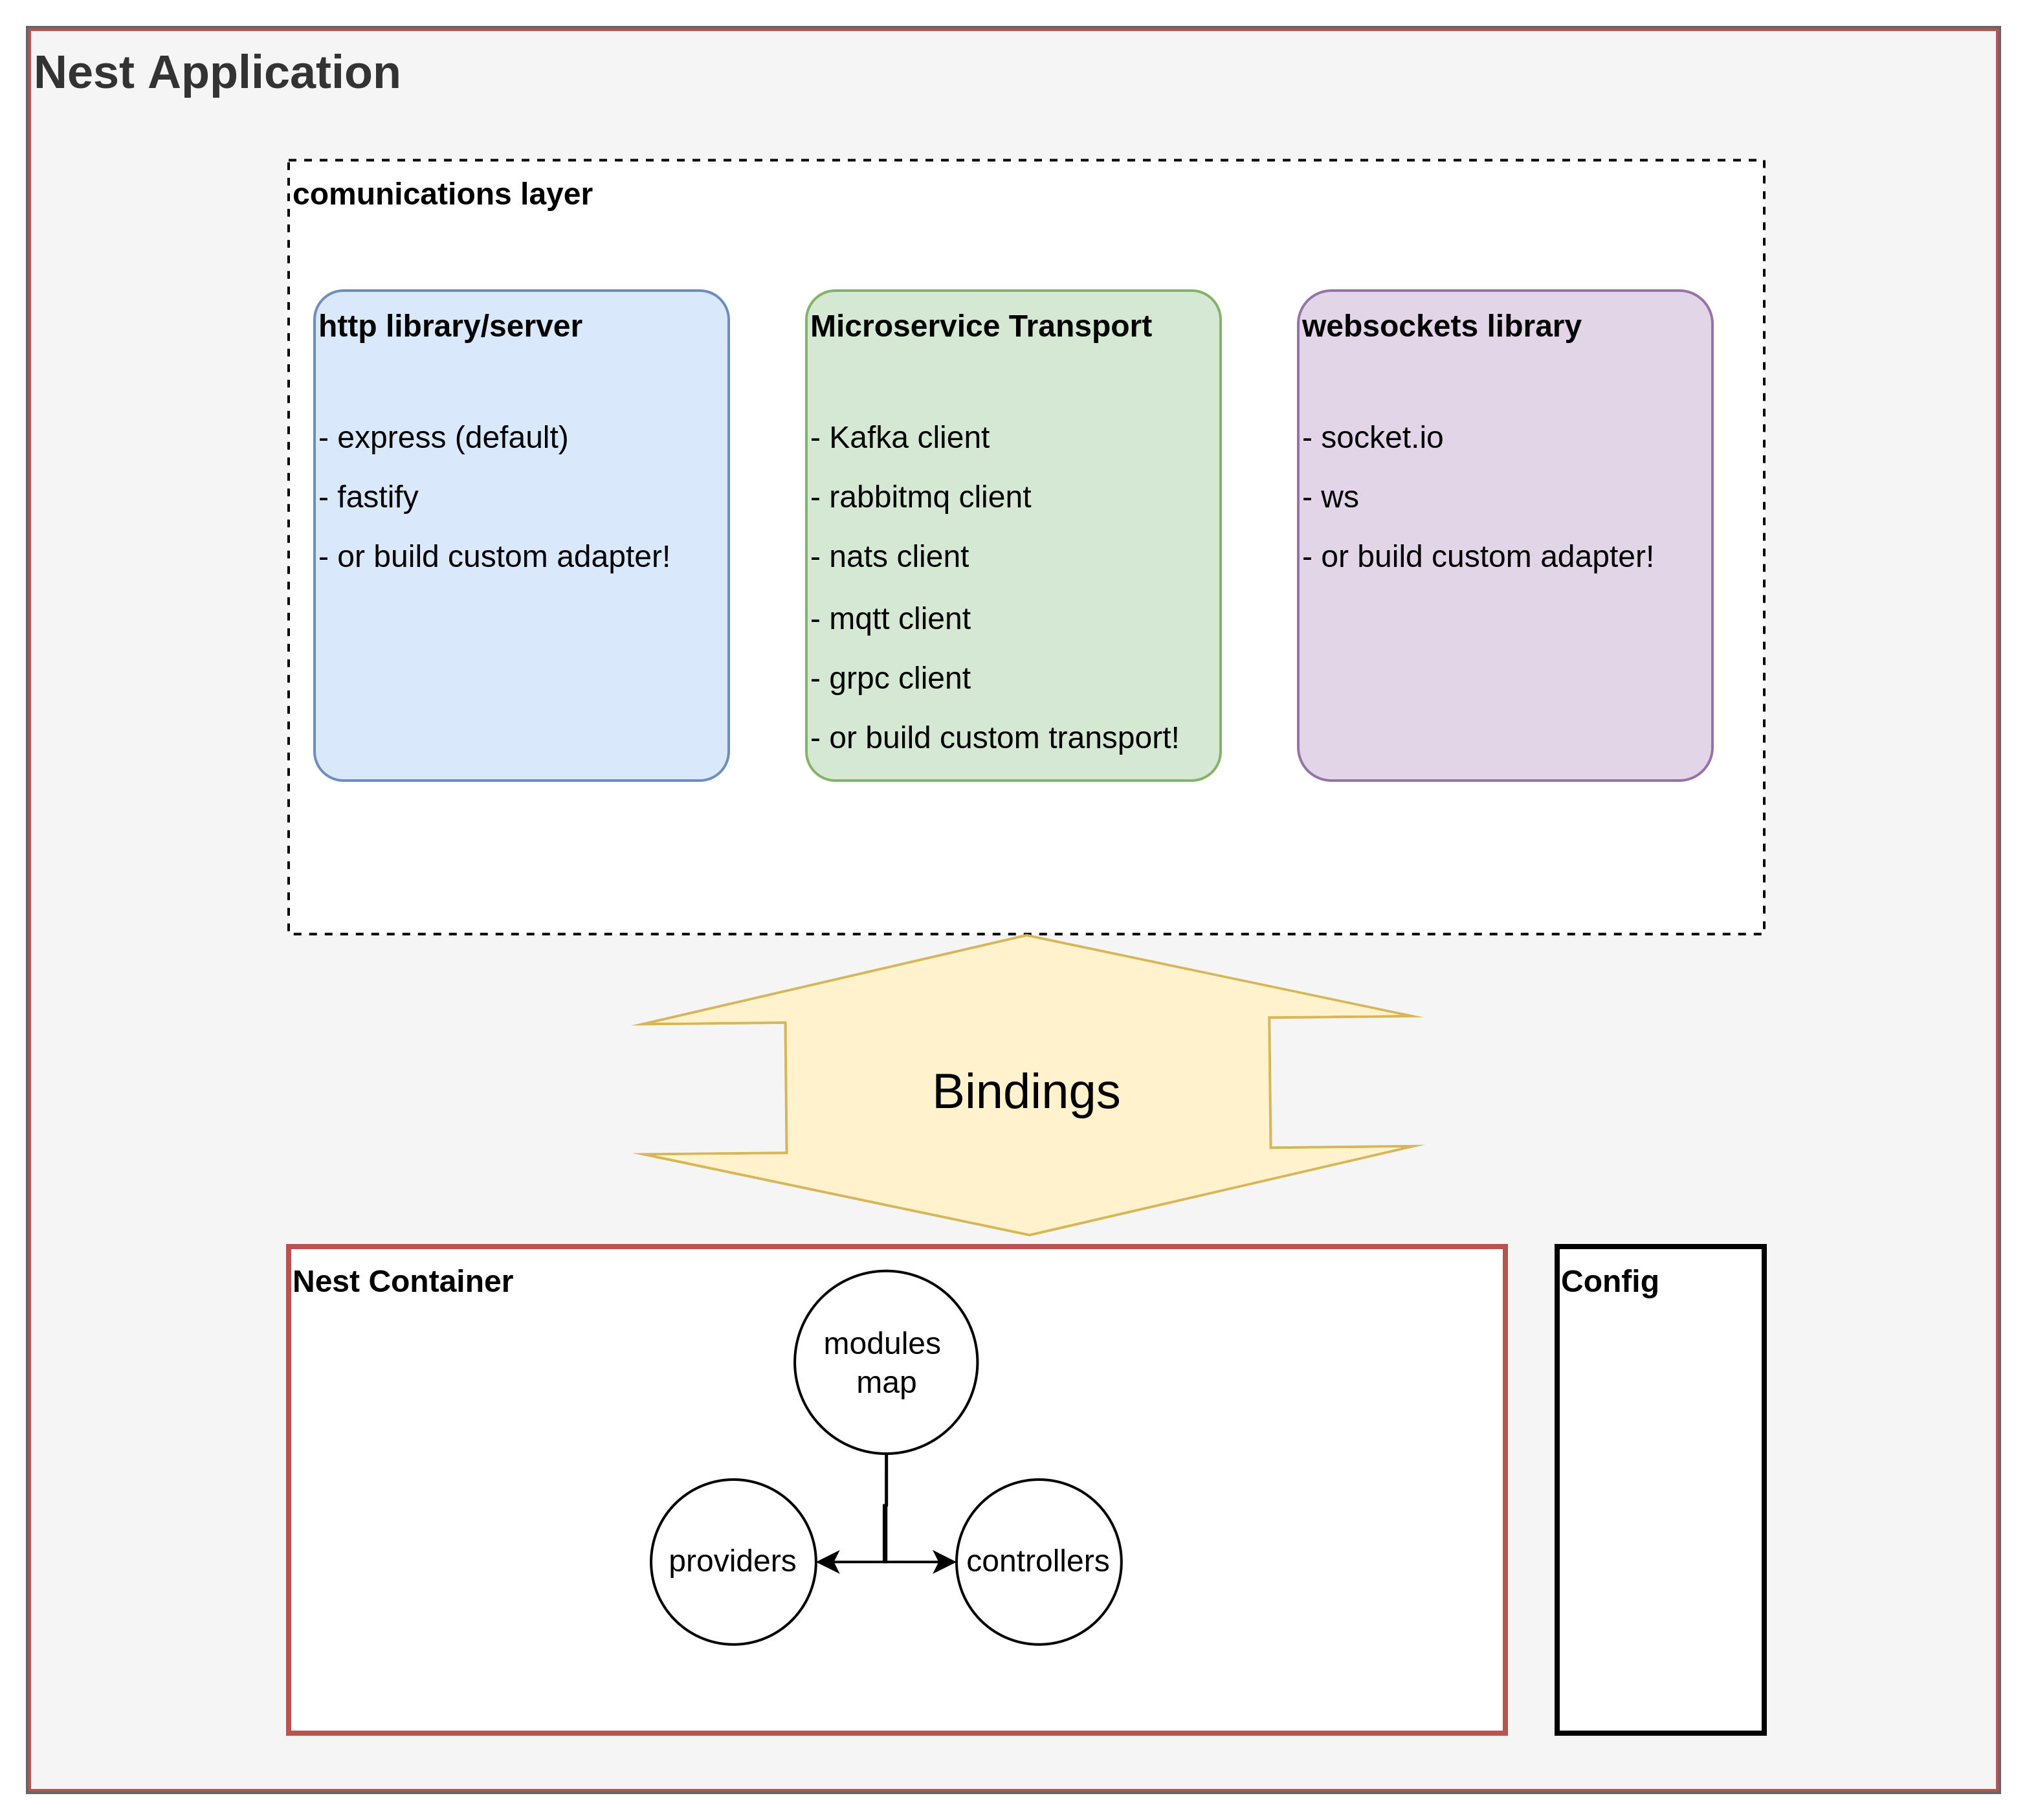
⚠️ Fig 1. This diagram includes abstractions that are not present in the source code and are for simplification and explanatory purposes only.
Going back to our main.ts file, we have the NestFactory.create(AppModule) call on line 9, this is responsible for:
- instantiating the communications layer with the given configs
- instantiating the Nest container and our modules (classes) with their configs, along with their dependencies.
- returning an instance of the NestJS application containing the instantiated communications layer, nest container and configurations.
Lastly, on line 18 we call app.listen(3000) which binds the communications layer with the nest container.
Communications layer
Nest is agnostic in many ways and one of them is communications, where it provides wrappers (or we can build our own!) for third party libraries.
It has three kinds of wrappers: Http and websockets, called adapters, and microservice, called transporters.
Out of the box, Nest provides wrappers for Express and Fastify for Http, socket.io and ws for websockets, and many message broker clients (see fig 1).
I have come across many people who weren't sure about the role that the wrapped third party communication library plays. What Nestjs actually wraps is (see fig 1):
- Http: an Http server
- Websockets: a websocket server, not a client, although having nestjs act as a client can actually be done, but it's outside of the scope of this article.
- Microservices: a client library that communicates with the desired broker (taking a Kafka cluster as broker for example, the client library wrapped is KafkaJS.) This means that the config options passed to the transporter are mostly the config options needed by the underlying library.
The dependency graph
Next let's focus on modules and dependencies in a little more depth.
How does Nest know the role of each class in our project? It achieves this by annotating classes with metadata using decorators, this way Nest knows how to and/or when to use a particular class.
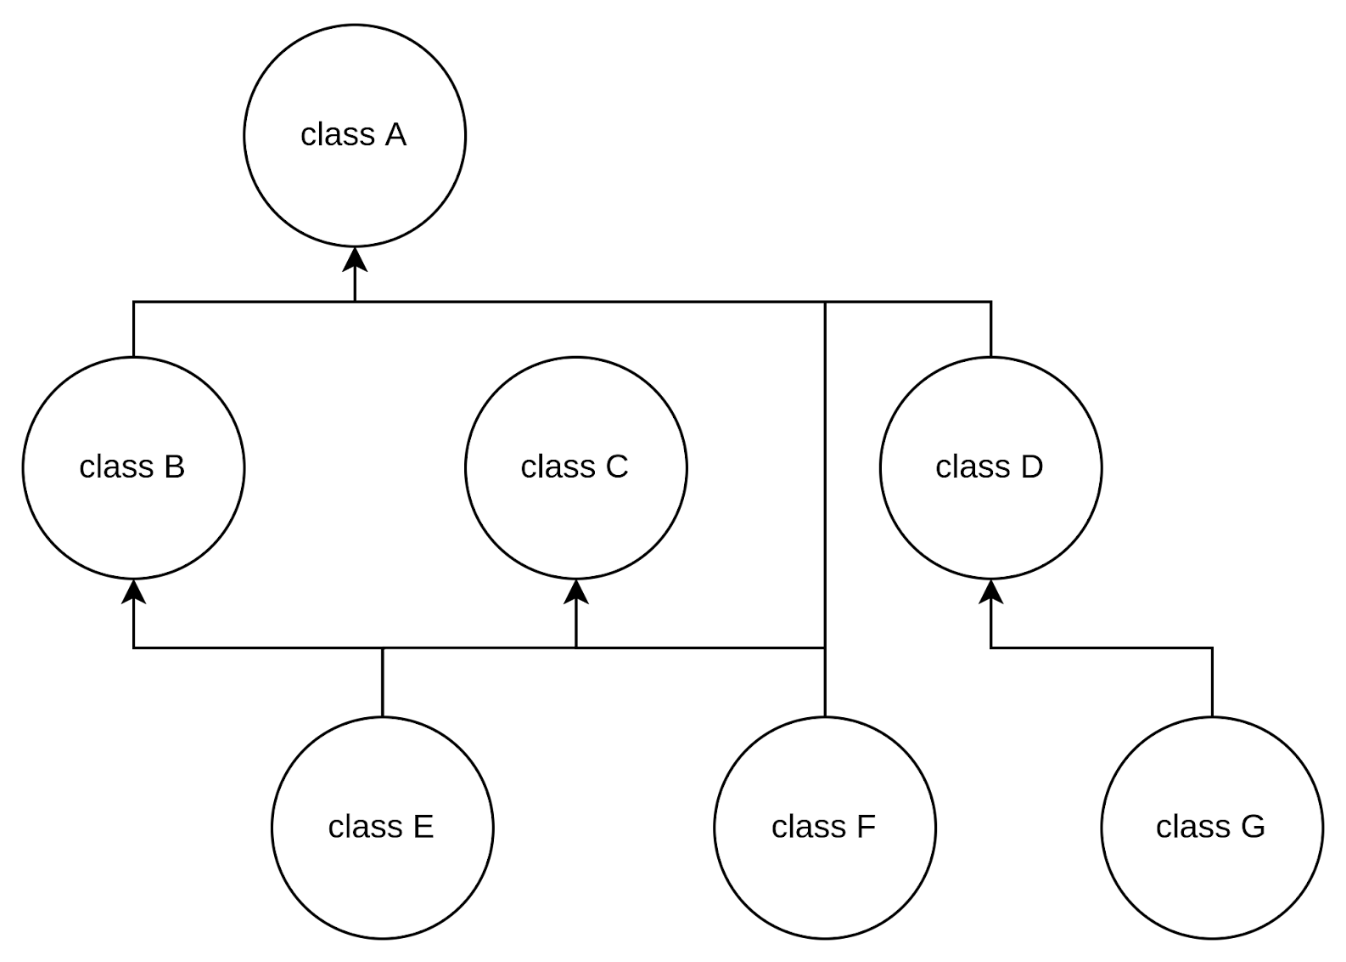
A very common pattern of this is the controller-service pattern, where a controller class handles requests and calls service classes to handle some business logic with the data of the request - be that data transformation, database read/write operations, or anything else really. The service class then can call other classes, and in turn they can make use of other classes and so on.
So we could easily have a graph of these potential relationships like this one.
Now as our project grows, the dependency graph becomes very hard to manage manually (as it must be instantiated from the bottom up).
Imagine this graph having 20 nodes.
Or 500.
We could even create circular references in our graph, although we should try to avoid them if possible, but if we absolutely needed them, Nest manages circular dependencies for us with a forwardRef.
NOTE: forwardRef should be used as a last resort, ideally we want to refactor our code and create shared modules to avoid circular dependencies all together, as they could potentially create hard to debug errors in our applications.
Now this raises the question:
Why do we need to do this? Shouldn't the module bundler (webpack, parcel, browserify, etc) just bundle everything and make the code we import available for us to use?

Since we are dealing with classes, we are under an Object Oriented Programming (OOP) paradigm, meaning it would be ideal to follow SOLID principles, and that's exactly why this is helpful.
NestJS creates a single instance of each class in the dependency graph, and keeps a reference of it for dependency injection, following the dependency inversion principle (D in SOLID), so in our dependency graph example, classes A, B and C will all make use of the same instance of class F, providing performance gains.
Note that this is not always the case as we can define the injection scope, but we will get to this later on.
Nest also provides callbacks that are ran when initializing our application and instantiating our classes, giving us control to execute arbitrary code at different stages of the application lifecycle, check out the documentation for more information about Nest lifecycle events
Bindings
With our application's communications layer up and our dependency graph instantiated, Nest can now bind the communications layer with the Nest container. This is how our requests or messages get handled by the matching route decorated method in the corresponding controller class.
This is done in a transparent way, so we don't need to worry about this, we just need to provide the correct configurations for the communication's wrapper (adapter or transporter). It's good for us to remember that a Nest application can have all of the three types of communications at the same time. Meaning that we could have an Http server, a websockets gateway (built on top of the Http server, as you may know websockets is an upgrade of an Http request), and a microservice client (which you could have many different clients of) - all existing within the same application
Bringing it all together
So now that our application has been bootstrapped. The application starts listening for requests/messages, as we can see in our main.ts file
- On line 17
app.startAllMicroservices()starts the corresponding client. - On line 18
app.listen(), or sometimesapp.init()instead, binds the communications layer with the Nest container. (Note thatlisten()internally callsinit())
On the topic of microservices
I want to address another common cause for confusion on microservices.
Sometimes we want to emit/send messages, and we have to register a clientsModule or proxyModule on the corresponding module.
But why do we need this?
Well Nest requires us to do this because the client that we defined in our main.ts file is intended for receiving events/messages. So if we want to send/emit something, we need to instantiate another client with the corresponding configuration for this task, and then we can inject it in the class where we need to send/emit.
Injection Scopes
When it comes to injection scopes; we stated that the default behavior of NestJS is to instantiate a singleton of our classes, and keep a reference of it for dependency injection purposes.
But we of course have other options, as we can pass in a scope argument to the @Injectable decorator to customize this behavior.
Nest provides us with three injection scopes:
- DEFAULT: the one we already talked about, a single instance will be created on application bootstrap and kept for as long as the app is running.
- REQUEST: when Request-scoped, an instance is created for each incoming request and garbage collected when finished processing it.
- TRANSIENT: when Transient-scoped, an instance is created for each consumer of the provider (the class where it is injected).
But what about controllers and module classes when we use different kinds of injection scopes?
Well, we can define the scope of the controller directly as well!
NOTE: One important thing to always keep in mind is that the scope bubbles up from the providers.
In other words, if we define an @Injectable or @Controller as REQUEST scoped, then every class that injects it: will also be REQUEST scoped, and so on up the dependency graph.
Injection Scope use-cases
So when would we use these different types of injection scopes?
Well, there are many use cases, but let's look at a few common ones: Let's say we need to configure a Provider with data that is defined per request, perhaps with information from the Header of every given request.
So in order to achieve this we must define its scope as REQUEST scoped. Keep in mind that we are sacrificing a bit of performance here as it will be instantiated when every request is received and garbage collected when it's done processing.
For another example, let's say we need a Provider to keep some state that is unique to the consumer of that provider (where it is injected). In this case we would define the Providers scope as TRANSIENT in order to provide a different instance to each consumer, this way we would have no issues with overlapping state.
We covered a lot in this article, but I hope this helps demystify a bit about NestJS's runtime, dependency injection system, and how it all ties together and operates.
There's one topic that we did not discuss here, and that is the execution context and arguments host, but don't worry, we will cover those topics in upcoming articles.
Learn NestJS - Official NestJS Courses 📚
Level-up your NestJS and Node.js ecosystem skills in these incremental workshop-style courses, from the NestJS Creator himself, and help support the NestJS framework! 🐈🚀 The NestJS Fundamentals Course is now LIVE and 25% off for a limited time!
🎉 NEW - NestJS Course Extensions now live!
- NestJS Advanced Concepts Course now LIVE!
- NestJS Advanced Bundle (Advanced Architecture and Advanced Concepts) now 22% OFF!
- NestJS Microservices now LIVE!
- NestJS Authentication / Authorization Course now LIVE!
- NestJS GraphQL Course (code-first & schema-first approaches) are now LIVE!
- NestJS Authentication / Authorization Course now LIVE!